Cisco Champion 2018

The Cisco Champions for 2018 have been announced and I am honored and proud to be able to announce that I have been selected. A special thanks goes to Pieter-Jan Nefkens (Twitter: @pjnef) for supporting and nominating me for this program.

What actually is a ‘Cisco Champion’? Several vendors have a global advocacy programs. For example the VMware vExpert and the Microsoft MVP programs. Well, for Cisco this is the Champion program.

But what defines a Champion? Well, Cisco Champions make a difference by:

  • Sharing experiences on Cisco products and services
  • Active in social communities such as Twitter, blogs or the Cisco Community sites
  • Contribute and share knowledge with the community others witch their questions

Cisco’s website describes it as follows:

Cisco Champions are passionate experts who share their perspectives with the community.

This designation comes with responsibilities. It is not a title you earn and then rest on your laurels. The exposure gives you the opportunity to help Cisco forward in areas which might need more attention and improvement. You can also help the community with challenges they are experiencing in day to day operations.

So I am proud of my designation as a Cisco Champion and will try to work even harder to deserve this title and help Cisco and the IT community wherever possible.

My expertise is primarily in Security and Wireless. So if you have any questions, don’t hesitate to ask. I will not always know the answer, but with the excellent Cisco Champion community behind me I am sure we will be able to help.


More information about the program can be found at https://communities.cisco.com/groups/cisco-champions


Cisco VPN client in Windows 10

Although the Cisco VPN Client 5.x has been End-of-Support since July 2014, it is still widely used. Up till Windows 8.1 the program could be installed and would function properly. However, in Windows 10 the VPN client does not function … by default! There is a workaround to get the software to function.

Personally I would advise using the Cisco AnyConnect Secure Mobility Client v4.x. This program is fully supported by Cisco and functions under Windows 10. However, this client only supports SSL VPNs and remote access VPNs based on IKEv2.

In my experience many firewalls are still using remote access VPNs based on IKEv1. If you need the Cisco VPN Client 5.x for this reason, this document is for you.

 Step 1

Obtain the latest Cisco VPN Client v5.x. This can be downloaded from http://www.cisco.com if you have the appropriate privileges.


Step 2

To be able to run the Cisco VPN Client you have to install a correct Deterministic Network Enhancer (DNE).

Download winfix.exe from ftp://files.citrix.com/winfix.exe, Install this file and run it.

If you already are on Windows 10, skip the following steps and jump to chapter ‘Additional steps for Windows 10 users

If you are on Windows 8, download and install the latest DNE:


Step 3
  • Install the Cisco VPN Client
  • Reboot the computer


Step 4

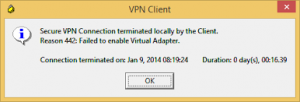
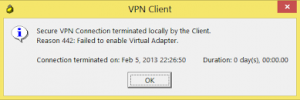
There is a possibility that you run into error ‘Reason 442’:

  • To resolve this error, a Registry Key has to be changed.Open the registry editor (regedit)
  • Browse to the following Registry Key:

HKEY_LOCAL_MACHINE\SYSTEM\CurrentControlSet\Services\CVirtA

  • Modify the DisplayName
    • For x86, change the value data from something like “@oem8.inf,%CVirtA_Desc%;Cisco Systems VPN Adapter” to “Cisco Systems VPN Adapter

    • For x64, change the value data from something like “@oem8.inf,%CVirtA_Desc%;Cisco Systems VPN Adapter for 64-bit Windows” to “Cisco Systems VPN Adapter for 64-bit Windows
  • Reboot the computer


Step 5 – Optional

Error reason 443 – Additional steps for Windows 10 users – 

If you experience error ‘Reason 443’ after following the instructions above, follow these steps in the exact order.

  • Uninstall any Cisco VPN software on the computer
  • Uninstall any DNE updater software
  • Reboot the computer
  • Run winfix.exe again
  • Reboot the computer
  • In order to run the Cisco VPN Client you have to install a new Deterministic Network Enhancer (DNE) versin. This is part of the SonicWall Global VPN Client and can be downloaded in a 32-bit (http://www.gleescape.com/wp-content/uploads/2014/09/sonic32.zip) and a 64-bit (http://www.gleescape.com/wp-content/uploads/2014/09/sonic64.zip) version.
  • Install the Dell SonicWall Global VPN Client
  • Reboot the computer
  • Install the Cisco VPN Client 5.x software
  • Open the registry editor (regedit)
    • Browse to the following Registry Key:

HKEY_LOCAL_MACHINE\SYSTEM\CurrentControlSet\Services\CVirtA

  • Modify the DisplayName if it states the following:
    • For x86, change the value data from something like “@oem8.inf,%CVirtA_Desc%;Cisco Systems VPN Adapter” to “Cisco Systems VPN Adapter
    • For x64, change the value data from something like “@oem8.inf,%CVirtA_Desc%;Cisco Systems VPN Adapter for 64-bit Windows” to “Cisco Systems VPN Adapter for 64-bit Windows
  • Reboot the computer


The Cisco VPN Client should now work in Windows 10.